Applies to all radio remote controls Flex HANDY
Before pairing, check that the LED indication of the transmitter and receiver shows normal status.
The STATUS LED on the transmitter must after the power on light green for about 1 second and then turn off.
The STATUS LED on the receiver must flash slowly in green and the POWER and COM LEDs must be steady red.
During pairing, the receiver must be switched on and in STAND-BY mode (ready for operation).
You must be directly at the receiver with the transmitter. When pairing, the transmitter must be approximately 5-10 cm close to the receiver.
Switch the transmitter into service mode
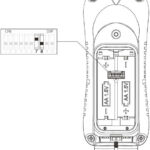
Remove the batteries from the transmitter and move the DIP #7 of DIP-switch under the batteries to the ON position – see picture below.
Insert the batteries and switch the transmitter on by releasing the STOP button. The STATUS LED will flash differently when switched on.
Pairing with receiver
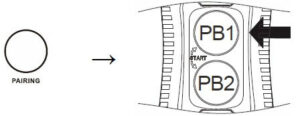
With the transmitter in pairing mode, get close to the receiver (place the top edge of the transmitter against the ARC logo on the receiver’s black label).
Simultaneously press PB1 on the transmitter and the pairing button on the receiver.
The STATUS LED on the transmitter will flash green rapidly at first and remain green after pairing is complete. Should it fail the first time, release the buttons and press them again after about a second.
When you have finished, switch the transmitter off, DIP #7 turn back to OFF (DIP 7 and 8 must always be OFF).
If you have an old transmitter, set the other DIPs to match.
Test all functions.
If you have any questions, please contact us at any time at service TER CESKA.